Avid CNC 60120 Pro: Difference between revisions
(→Laser) |
No edit summary |
||
| Line 137: | Line 137: | ||
* https://www.avidcnc.com/pro-rack-and-pinion-drive-nema-34-p-226.html | * https://www.avidcnc.com/pro-rack-and-pinion-drive-nema-34-p-226.html | ||
=Surfacing= | =Spoil board= | ||
==Surfacing== | |||
G90 (absolute positioning) | G90 (absolute positioning) | ||
G53 (machine coordinates) | G53 (machine coordinates) | ||
| Line 155: | Line 156: | ||
M3 (spindle off) | M3 (spindle off) | ||
G91 G28 Z0 X0 Y0 (home axes) | G91 G28 Z0 X0 Y0 (home axes) | ||
==Layout== | |||
<gallery> | |||
Avid-cnc-spoil-board.scad.png|Spoil board model | |||
</gallery> | |||
=Laser= | =Laser= | ||
Revision as of 18:39, 10 May 2021

On Tue Apr 14, we purchased a chcrouterparts.com 5x10 Pro CNC router kit. This page documents the changes I've made to that machine, and the processes used to work with it.
Workflow
- Turn main power knob on control box
- Turn motor enable knob on control box
- Turn spindle power knob on spindle control box
- Power on control laptop
- Start Mach4
- Home X/Y/Z axes using button in upper left corner
- Click "OK" when presented with a window confirming completion of the homing procedure
- Load GCode file for machining by clicking "File op" button
- Begin machining by clicking the "Cycle start" button
- Home X/Y/Z axes using button in upper left corner
- Power down machine by turning main power, motor enable, and spindle power knobs back to the off position.
Assembly Instructions
http://www.cncrouterparts.com/support/pro/60120/Preparation/
Tooling
- CNC pen / sharpie holder for plotter
- inexpensive endmills
- corner rounding endmill
- S30 Turnkey Automatic Toolchanger kit
Work holding
| Quantity | Part | Link |
|---|---|---|
| 1 | E-Z Lok Threaded Insert, Zinc, Hex-Flanged, 1/4"-20 Internal Threads, 13mm Length (Pack of 100) | Amazon |
| 1 | Performix 11604-6 Blue Plasti Dip, 14.5 fl oz | Amazon |
| 2 | Lot 10 Each 1/4 20 Male Thread Star Knobs 2” Diameter with 2" Long Threaded Post | Amazon |
| 1 | Woodworking Workbench Peg Stoppers for 3/4 inch Holes | Black – 8 Pack | Amazon |
| 2 | Kreg KBCIC In-Line Clamp (Pack of 2) | Amazon |
| 5 | Craftsman Auto-Adjust Push Peg Clamp 949808 | Amazon |
Speeds and feeds
Dust Collection
| Quantity | Part | Link |
|---|---|---|
| 1 | Spindle Dust Shoe Cover | Amazon Universal CNC dust shoe |
| 1 | Duct reducer | Amazon - replace with 3D print |
| 1 | Elbow for dust collection and cylclonic seperator | Thingiverse |
| 1 | 20 feet of 4" diameter PVC hose | Amazon |
| 1 | 6 inch duct fan | Amazon |
| 1 | Replacement dust brush | Amazon |
Electronics
Replacement of Ethernet Smoothstepper
The ethernet smoothstepper, while an impressive device, does not appear to be well documented or supported by Free Software. I've decided to replace it with a raspberry pi 3b+ running cnc.js and arduino mega 2560 running grbl. I've created a protoboard PCB to house the pi and arduino and to provide mounting points within the electronics cabinet. Polarized 26 pin headers have been used to interface with the existing smoothstepper compatible connectors. In this way, the electronics cabinet can be restored to original configuration with minimal effort.
| Quantity | Part | Link |
|---|---|---|
| 1 | Arduino MEGA 2560 PRO | Amazon |
| 1 | LPC1768 mbed development board | ebay |
| 1 | 15Pcs 2x13 Pins 2.54mm Pitch Straight Connector Pin IDC Box Headers | Amazon |
Initial firmware will focus on cnc.js and the grbl-Mega Atmega 2560 port of grbl. LPC1768 port of grbl is available as a fallback.
grbl
The settings page lists only inversion values for XYZ axes, however when using dual X or Y axis, inverting both motors requires inverting a currently undocumented (As far as I can find) N axis.
| $3 Value | Mask | Invert X | Invert Y | Invert Z | Invert N |
|---|---|---|---|---|---|
| 0 | 0000 | N | N | N | N |
| 1 | 0001 | Y | N | N | N |
| 2 | 0010 | N | Y | N | N |
| 3 | 0011 | Y | Y | N | N |
| 4 | 0100 | N | N | Y | N |
| 5 | 0101 | Y | N | Y | N |
| 6 | 0110 | N | Y | Y | N |
| 7 | 0111 | Y | Y | Y | N |
| 8 | 1000 | N | N | N | Y |
| 9 | 1001 | Y | N | N | Y |
| 10 | 1010 | N | Y | N | Y |
| 11 | 1011 | Y | Y | N | Y |
| 12 | 1100 | N | N | Y | Y |
| 13 | 1101 | Y | N | Y | Y |
| 14 | 1110 | N | Y | Y | Y |
| 15 | 1111 | Y | Y | Y | Y |
Calibration
- 1 inch pinion
- 3.14159 inch / rev
- 3.2:1 reduction
- 3.14159 / 3.2 = 0.9817 inches
- 200 steps / rev
- 203.718 steps / inch
- 0.004908 inches /step
- 8.020796321 steps / mm
- 0.1246759 mm / step
Spoil board
Surfacing
 G90 (absolute positioning)
 G53 (machine coordinates)
 G20 (inch)
 G1 Z-5 F50 (safe position)
 M3 S20000 (spindle on)
 G1 Z-6.75 F30 (cut position)
 G91 (relative positioning)
 M98 P1000 L300 (run subprogram)
 O1000 (name subprogram)
 G1 X60.8 F150 (cut to end of x axis)
 G1 Y0.2 F150 (advance Y axis)
 G1 X-60.8 F150 (return cut on x axis)
 G1 Y0.2 F150 (advance Y axis)
 M99 (return subprogram)
 G1 Z5 F150 (safe position)
 M3 (spindle off)
 G91 G28 Z0 X0 Y0 (home axes)
Layout
-
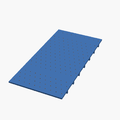
Spoil board model

Laser
-
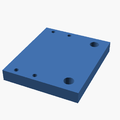
Laser mounting plate

| Quantity | Part | Link |
|---|---|---|
| 1 | 5.5W optical (20W wall) 450nm laser module |
 Interface specification: 4pin PH2.0 (red: 12V, black: GND, yellow: PWM, green: temperature signal)
 Wavelength: 450nm
 Radiator size: 30*80mm
 Material: copper + aluminum
 Weight: 202g
 Drive position: built-in
 Is the power adjustable: PWM can be adjusted, PWM: 50KHz-20KHz / 3.3V-12V
 Drive protection: surge protection, overvoltage protection
 Input power: approx. 12V2A, about20W (without fan power)
 Output optical power: 5.5W
 Line length: 300mm
 Control line installation method: pluggable
 Fan size: 30*10mm
 Fan speed: 15000 rpm
 Controllable temperature: less than 60 degrees Celsius
 Best focus range: 40mm-50mm
References
- Avid chip load calculator (xls spreadsheet).
- Candle Grbl controller
- Mach4 Programming Manual